Get My Tips On Digital Photography
Name:
Email:

I respect your email privacy and you can unsubscribe at and time.

Wednesday, 27 October 2010

Canon Powershot S95 Review


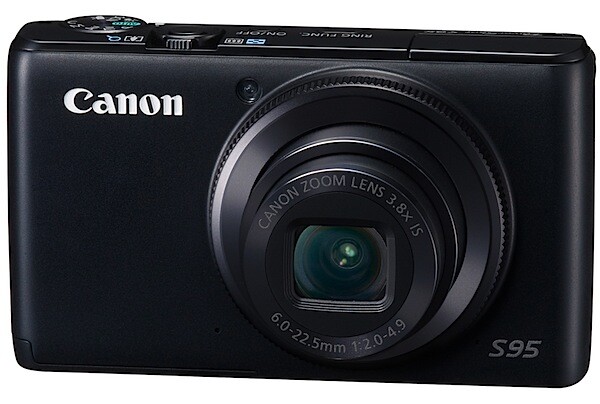
At first the Canon PowerShot S95 seems to be just another point-and-shooter: compact, all black and stylish. Then a quick glance over the specs and external controls leads you to think otherwise.

PowerShot S95_01.jpg
PowerShot S95_04.jpg

Canon Powershot S95 Features

The CCD has 10.0 megapixels; the lens is a fast f2 zoom that has a range from 28-105mm as a 35 SLR equivalent.

In exposure, it has access to Program AE as well as shutter and aperture priority plus manual.
Using a hybrid IS system the camera offers a more advanced image stabilisation, reducing camera shake by the equivalent of four f stops. 

Fruit and veg section 2.jpg
The camera has a High Dynamic Range mode accomplished by simultaneously capturing three images with different exposures, then combining them into a single image using in-camera software. 

Wig dummies 3.jpg

Maximum image size is 3648×2736 pixels, enabling a 31×23 cm print to be made at 300 dpi. Movies: 1280×720 pixels at 30 fps.

And the good news keeps coming: you can shoot pictures in RAW and JEPG as well as simultaneous RAW+JPEG files saved to the card.

The less than good news is the maximum continuous speed is only 1.9 images/second with focus and exposure set before shooting; if you want continuous focus, the capture rate is only seven frames in 10 seconds. The camera will continue shooting as long as you hold down the shutter button.

Canon Powershot S95 ISO Tests

Canon PowerShot S95 ISO 80 f4 1:20 sec.jpg
At ISO 80, superb of course.
Canon PowerShot S95 ISO 400 f4 1:100 sec.jpg
At ISO 400, nearly as good but with a very slight rise in noise.
Canon PowerShot S95 ISO 800 f4 1:200.jpg
At ISO 800, nearly the same as ISO 400.
Canon PowerShot S95 ISO 1600 f4 1:400 sec.jpg
At ISO 1600, not much noisier than ISO 800. Still useable.
Canon PowerShot S95 ISO 3200 f4 1:800 sec.jpg

At ISO 3200, noise is noticeable and definition lower. Useable at a pinch.

Startup Time

It took less than two seconds from power on to first shot. Follow-ons about a second apart.

Distortion

There was no sign of any distortion with the zoom lens set at wide and tele. A good performance.

Poster 2.jpg

Comment

There’s not much to whinge about… except the all black finish naturally leads to the top controls — power and shutter are in black —being hard to see. Maybe it’s me.

I found the S95 a delight to use, very pro and quick. Quality: pin sharp pics, excellent tonal range.
Why you would buy the S95: you would prefer a vari-angle LCD screen; you need RAW capture.
Why you wouldn’t: the camera does not shoot Full HD 1920×1080 pixels; it does not offer Adobe RGB colour space.

However, this is a very special camera.

Canon Powershot S95 Specifications

Image Sensor: 10.0 million effective pixels.
Metering: Evaluative, centre-weighted average, spot.
Sensor Size: 14.9mm CCD.
Lens: Canon f2.0-4.9/6.0-22.5mm (28-105mm as 35 SLR equivalent).
Shutter Speed: 15 to 1/1600 second.
Continuous Shooting: 0.8 to 1.9 images/second.
Memory: SD, SDHC, SDXC, MMC, MMCplus, HC MMC plus cards.
Image Sizes (pixels): 3648×2736 to 640×360. Movies: 1280×720, 640×480, 320×240 at 30 fps.
LCD Screen: 7.6cm LCD (461,000 pixels).
File Formats: RAW, JPEG, RAW+JPEG, Motion JPEG.
ISO Sensitivity: Auto, 80 to 3200.
Interface: USB 2.0, HDMI mini, AV.
Power: Rechargeable lithium ion battery, DC input.
Dimensions: 99.8×58.4×29.5 WHDmm.
Weight: Approx. 193 g (inc battery and card).
Price: Get a price on the Canon PowerShot S95 at Amazon.


Click here for more info on the Canon PowerShot S95

Tuesday, 26 October 2010

5 Essential Digital Photography Accessories You Can Make Yourself


digital photography accessoriesPhotography certainly isn’t the cheapest of hobbies to take up. If you’re serious about it then you’re going to need a good digital SLR, a selection of lenses and a decent set of extras to keep you snap-happy.

There’s a startling array of accessories out there for the amateur enthusiast, and though many are cheap there’s plenty that aren’t. Luckily, you’ll be pleased to hear that many of those costly bits of plastic and card are simply that – plastic and card, which can be built for a fraction of the cost.

Those of you who don’t have the cash to flash and enjoy a little challenge will find some of the do-it-yourself projects in this list satisfying, especially when you’re saving money (probably to buy more lenses, if you’re anything like me).

The DIY Softbox

If you’ve ever taken an interest in macro photography then pay attention. A softbox is essentially a light tent, designed to soften harsh light and shadows to provide a nice even exposure and near-perfect lighting.

digital photography accessories

Pretty much every “product shot” of any gadget you own will have been shot in one of these, and you can quite easily customise it to suit your own demands. A nice shiny floor tile from your local DIY store is all it takes to sex one these up!

To make one you’re going to need an old cardboard box, some black and white card and a source of light. If you don’t have a flash unit, you can fire remotely (either wirelessly or with a hot-shoe cord) then you could use a desk lamp or even bright torch, just remember your white balance.

Sunday, 24 October 2010

Shooting Landscapes with Longer Focal Lengths


One of the simpler tips that I would suggest for those wanting to add a little variety to their landscape photography is to shoot with longer focal lengths. 


400mm - Image by Tambako the Jagua


While the majority of landscape photography is done with wide angle lenses (and rightly so – it’s a great way to capture to dramatic wide vistas) it can be very effective to take a lens with a longer focal length with you next time you set out to capture a scene. 

Friday, 22 October 2010

Setting Up Your Digital Camera For HDR Shooting

Today we begin a 3 part series – a Beginners Guide to HDR Photography by looking at how to set your digital camera up for shooting HDR images. This series is written by James Brandon.

Introduction

HDRsample.jpg

You’ve probably heard of High Dynamic Range (HDR) Photography, it’s made quite an entrance into the world of digital photography.
If you haven’t, the HDR process is accomplished by taking multiple exposures of a high contrast scene (usually a landscape or cityscape), at different levels of brightness, and then combining the best light from each exposure into one image.

The end result is a stunning image that very closely resembles how the human eye views a scene. This process of digital manipulation has caused a bit of controversy and debate in the world of photography, especially with images that are “over-cooked.” One thing is for sure though, HDR is here to stay. When done right, this unique and in depth processing technique can produce beautiful works of art that mimic the way we view and remember a landscape or scene.

The above image is an example of what HDR processing can produce. This image, taken from the Big Island of Hawaii, would not be possible without HDR processing. It was taken around noon, the harshest light of the day. The first image is the best image my camera could produce given the situation. While still beautiful, there are obvious problems. Get ready, this article is going to show you how to take your digital camera and turn it into an HDR shooting machine!

Step 1: Locate Your Camera Manual

I know, we all hate manuals. But if you want to become the best photographer you can be, you need to become best friends with your cameras manual. Spend time with it, take it with you on trips, read it in the airplane, memorize every setting on your camera so you know it inside and out, make your significant other jealous of it. And for this lesson, have it handy as a decoder in case you have a different camera model. If you don’t have your manual, simply do a Google search for: (your camera model) manual. You should be able to easily find a pdf version to download.

Wednesday, 20 October 2010

Methods to Make Your Photos Exceptional With Simple Photo Editing Techniques

An image can capture that special moment of yours which you will always cherish. How well it had been captured and edited will sweeten your memory all the more. But if the image wasn't captured well maybe edited later. Here comes the essential role of photo editing. These days photo editing is an essential part of photography itself. A lot of emphasis is put on it.

The way in which a photograph is edited can make a lot of difference. If some simple editing methods are kept in mind and followed they will result in getting exceptional photos. These techniques might look simple and easy but they do make a huge difference to the overall result. For this reason, we will be discussing some very simple and basic editing techniques which would be beneficial for you.

The first and foremost tip you need to remember before starting the editing is that, to get superior and great photos you will need to try to make use of the techniques mentioned below

1. Brightness/Contrast: this is the most simple and most widely used technique. This is to be used if the image was too dark or was clicked in a too bright environment.

2. Hue and saturation: these are used basically to control the color content of a photograph.
Hue balances the color while Saturation alters the strength of the color.

3. Removing red eye: most of the imagee editing software programs have red eye removal facility. Just select the red eye removal icon and choose the area around the eyes. The red eye will be removed.

4. Sharpen the image: by sharpening a picture the photo will give a much better look and would be less grainy. It will give a crisp image.

5. Sizing: the size of a photo also determines the quality you are getting.

6. Noise: this is used to add a film of grain over the photo. It will give you a classic look.

7. Adjusting color levels : the color levels may be adjusted in order to give a more balanced use of all colors as well as remove different color imbalances.

These are a few of the very basic editing techniques that have been discussed. These might seem to you quite simple or few in number but they will certainly help you to achieve outstanding photos.


Photo Editor X Photo Editing Software Banner

12 Ways To Never Miss A Photo Opportunity

from Digital Photography School by Jim Goldstein

The following post on 12 Ways To Never Miss A Photo Opportunity is by San Francisco based photographer Jim M. Goldstein. Learn more about him at the end of this post.

Nothing is more frustrating than seeing a great moment to photograph, but missing the opportunity to do so. I’ve missed my fair share of great moments either due to timing or worse lack of preparedness. Either way it’s no fun to miss a photo whatever the circumstances. The Art Of Being Prepared is just that, an art. So what can you do to minimize the chance you’ll miss that next great photo? Here are 12 ways to never miss a photo…

1. Have a camera bag that enables you to easily and quickly access your camera

lowepro-slingshot-100If you’re stuck with an overly complicated bag that takes too long to open or is organized in such a way that other gear is in the way of you getting to your camera quickly you’re guaranteed to miss that next great spontaneous photo. Look for bags that have quick access flaps and aren’t cumbersome to secure.
note from the editor: lately we’ve been using a Lowepro SlingShot 100 (pictured left) which enables you to quickly get your DSLR off your back by flipping it around.


2. Be sure to have not just (1) one fully charged battery but (2) two

It’s easy to loose track of how long you’ve been using one battery and if your battery status is 1/4 full what does that really mean? Is a 1/4 battery going to last 30 minutes or 20 photos? It’s tough to tell and you might not know it, but battery life is dependent on how cold it is. Yup that’s right cold batteries don’t last as long, but there is a way around that as I discuss in a recent photo outing “Los Angeles City Lights & Maximizing Your Battery Life“. The trick… warm up your battery to squeeze out a few extra photos. Certainly a good tip to know if you’re in a squeeze, but why play with fire when you can just plan ahead. Carry that second battery with you and never make an excuse to leave it behind. You won’t regret it.


Sea Nettle Jellyfish at the Monterey Bay Aquarium photo by Jim M. Goldstein


3. Be sure to clean the front and rear elements of your lens to minimize spots (optionally cleaning your camera sensor)

Spots in your photos are first and foremost lost data. Data you can fill with a cloning or healing brush, but lost data none the less. Why miss out on the original when you can get it right the first time with a little forethought. Properly preparing your lenses and camera will enable you to get the photo right the first time reduce the time you spend post-processing and dealing with spotting your images.

Sunday, 17 October 2010

Books Scott Kelby's Digital Photography Boxed Set


The Digital Photography Boxed Set by Scott Kelby contains the following books:
The Digital Photography Book
The Digital Photography Book, Volume 2
The Digital Photography Book, Volume 3

Scott Kelby, the man who changed the "digital darkroom" forever with his groundbreaking, #1 bestselling, award-winning book The Photoshop Book for Digital Photographers, shows which button to push, which setting to use, when to use them, and hundreds of the most closely guarded photographic "tricks of the trade" to get budding photographers shooting dramatically better-looking, sharper, more colorful, more professional-looking photos with their digital camera every time they press the shutter button.

Scott tackles the most important side of digital photography--how to take pro-quality shots using the same tricks today's top digital pros use (and it's easier than you'd think). Each chapter is packed with plain English tips on using flash, shooting close up photography, travel photography, shooting people, and even how to build a studio from scratch, where he demystifies the process so anyone can start taking pro-quality portraits today! Plus, he's got full chapters on his most requested topics, including loads of tips for landscape photographers, wedding photographers, and there's an entire chapter devoted to sharing some of the pro's secrets for making your photos look more professional, no matter what you're shooting.


Saturday, 16 October 2010

Some Additional Digital Photography Accessories

Using Digital photography accessories increases the versatility of your digital cameras and your hobby or professional practice.

While some accessories, such as batteries and flash memory cards is important and other digital camera accessories, such as special lenses, tripods and docking stations, mainly aimed at professional photographers, But can the amateur hobbyist also find value investing in them.

Additional Digital Camera accessories:

The camera's lens
Specialized lenses can improve a photographer shoots; While some lenses are used primarily by professionals, is zoom lens, a type which amateurs can enjoy without much training. Zoom lenses, also known as Telephoto lenses, is used when a photographer cannot get close to his subject; for example, try to take a character who shot an insect or an action shot at a sporting event; A telephoto lens enhances the quality of these types of images.

In addition to the telephoto lens, the pros consider using a macro lens, a fisheye lens, or a wide angle lens. While the macro lens enlarges small subjects in images (such as a fly eyes), both the fisheye and wide-angle lenses to absorb substances has a wide scope, such as overviews of the cities or landscape shots.

Memory card
Memory card will vary depending on the digital camera model. A card that fits a camera does not necessarily fit into another; Before they buy a camera, determine what type of memory card it requires.
Digital cameras come with a certain amount of built-in memory.Higher end cameras have not only more onboard memory than less expensive card, but they can also take photos of higher pixilation. the higher the pixilation, the more memory the photo file, however, requires.

Some people may find the built-in memory that comes with digital cameras woefully inadequate. Special occasions, such as vacation or weddings are both situations as a photographer should have sufficient camera with memory; Therefore consider most photographers additional
memory an essential.

Tripod
A tripod is essential accessories only for the professional photographer.An amateur photographer with shaky hands can find tripod useful for preventing blurriness.

Macro (or near) photography, tripods are wonderful digital accessories; the more you zoom in on an object, the more sensitive digital cameras become mobility. Also steadiest photographer can therefore avoid destroying a photo using a tripod.

Flash-annexes
Pros may need a special flash attached, as the more advanced cameras they use cannot come with a built-in Flash; Photographers can also use the various types of films, not just the switch between color and black and white, but they can also use the films of different speeds, While slower film speed is best used in poorly lit scenes using only ambient lighting, faster speeds are more suitable for your action shots, such as cars faster.

Batteries
You should always have extra batteries with you.This is particularly true with digital cameras tend to have shorter battery life; With a digital camera, you usually think of approximately two hours of power or approx. 150 shots before you need a battery products freshly caught, but this can vary depending
If the settings are applied to it.

Battery charger
This is another popular items for digital camera owners, if you are on a long trip, you may be able to charge the batteries every night you continue to shoot the next day.

Camera bag
Another important piece of equipment have is a camera bag; often overlooked as a photographic tools, camera bags not only implement your extra memory cards, batteries, and extra lenses, but they also protect the camera between uses.

Photo printers
While the computer images photos are comfortably, you want to print, and frame your photos; A good quality photo printer saves money in the long term for the printing of digital images at photography shops can be expensive; Photo printers come in all shapes and sizes, depending on your printing needs.

Software programs
Digital cameras that come with the software editors who are often quite basic. Photographers who invest time in the Edit and modify images should consider more advanced photo editing software which has far more features and options for editing.

These are just a few digital photography accessories which you might want to invest in, regardless of whether you are a hobbyist, amateur or professional photographer; some are necessary, others do not, is to take quality pictures or manipulate digital images.


Friday, 15 October 2010

Why backgrounds are important

Digital photography is more than just point and shoot photos with a digital camera. Digital photography is a art form. There are many things to consider before you take a photo. Probably none more important than a good background for your photo.

With digital images, a good background always improves the overall look of the image. When you select a topic, it is equally important to choose a good background; the reason for this is that light can make or break your photo.

It is very easy to lose the subject of the image in the background; most people just point and shot a camera and don't stop to think about what the image will eventually turn out like before shooting a picture, stop and look at the background and your photos will turn out much better.

Let us take a look at some suggestions that will help you to create an image, which makes good use of backgrounds.

Competition
There should be no competition between the background and the subject. when viewing a picture, you should immediately be able to identify the subject i.e. the focal point.

Contrast
The eye must be able to identify the subject from the background. A subject must be contrasted with the background, this is absolutely essential for every photo.

Complement
The background should not over-power the picture. The background should always complement the subject, help focus and displays the subject.

Colour
Colour is linked to complement and crucial for each photo. The background colour should always complement the colour of the subject. Some colours will bleed on the subject, so check out each picture before taking the next picture.

Just focus on the subject and then selecting a good background.

When an artist begins a new painting on a blank canvas, the background will be important. A good background actually supports the subject and makes it a success.

This may sound like a lot to consider before taking a picture, but it is certainly not, but it does require a lot of practice; The more you practice, the better the images you will shoot.

So decide carefully what's in the background, how it relates to your topic and whether the supports the subject. for example, you might want to approach the subject to cut down on the amount of light you have in your photo.

If you thing of digital photography as an art form, your digital pictures will be better for it.

Thursday, 14 October 2010

SP500 Platinum Photo Studio In a Box by Square Perfect

SP500 Platinum Photo Studio In a Box by Square PerfectOur tent's light weight and easy to set up table top design, the soft light box utilizes a specially woven, heat resistant, 100% velour fabric, which delivers uniform illumination while eliminating harsh shadows and reflective glare. Folds up for convenient storage and travel. Our tents are of the highest quality and we guarantee your satisfaction. We have included a 30 x 30 x 30 size and 12 x 12" x 12" with large front openings which makes taking multiple studio shots a snap.Also included are extra front coverings with a lens/camera slit for completely surrounding your subject. We've decided to supply you with 3 extra large colored sheets for internal modeling (Red, Blue, Black and white) at no extra charge. The velcro fastening system and spring-like frame enables the unit to be folded down and stored in the included zip case for very easy transport and storage.
Price: $349.95
Click here for more info from Amazon

Wednesday, 13 October 2010

Digital Photography Tips - Using Exposure Compensation To Improve Your Digital Photos


The automatic exposure feature on today's inexpensive digital cameras is often better than the auto exposure was on expensive film cameras 10 years ago. Advances in computers allow a very sophisticated auto exposure brain to be packed into a tiny space in today's digital cameras.

But even the most sophisticated auto exposure features can sometimes simply make an error or read the scene wrong and set the wrong exposure. The exposure compensation feature of your digital camera enables you to compensate for these mis-readings by making your photos lighter or darker than you would get using auto exposure alone. Here are some tips for improving your digital photos by using the exposure compensation feature of your digital camera.

1. Take a photo and check the exposure - After you take your photo, review it in your camera's LCD screen. One of the joys of digital photography is that you can always lighten or darken a digital photo later using Photoshop or another kind of digital photo editing software. However, while you're still on the scene, why not use the exposure compensation feature to make the correction in the original. Photoshop can darken a picture after the fact, but it can't bring back details that were lost in an overly bright section of your original photo. If they got washed out when the picture was taken, they are simply not there to bring back.

2. Choose the camera program settings - You can always use exposure compensation with the fully automatic mode, but there is a better way. If you want to maximize the depth of field, switch to aperture priority and keep the camera aperture small. Of course this will decrease the shutter speed to allow more light to come in to the camera. Be sure the resulting exposure will not be at a shutter speed of less than 1/125th unless you are using a tripod.

If you are shooting a moving object, you'll have to switch to shutter priority and set the shutter speed fast enough to eliminate blurring - usually at least 1/400th. Just keep in mind that, when you do this, the depth of field will suffer, so focus carefully on your main subject.

After you've selected aperture or shutter priority, take another photo and check the results. If the depth of field and sharpness are acceptable, now it's time to use exposure compensation.

Most digital cameras allow you to increase or decrease the auto exposure setting by 2 stops in 1/3 stop increments. You'll have to check your digital camera's manual to see just how to do it. It varies by camera. Start by adjusting the exposure compensation + 2/3 or - 2/3, depending on whether your auto exposure photos was too light or too dark. Take another photo and check the results. If it's still not right, make an additional adjustment to the exposure compensation and try again.

Exposure compensation gives you much more control over the exposure setting so your digital camera. Just remember, once you go to your next photo taking session, to be sure to return the + 2/3 or - 2/3 or whatever to -0-. Otherwise you'll get exposure compensation on your next photos without wanting it.


Dave Hunt has shot landscape and scenic photos in almost all states of the US and in most countries in Europe. He is the author of numerous articles on photography, travel and recreation. You can find more articles, tips and how-to's, along with and the latest news and information on digital photography at: http://www.digitalphotographygeek.com For tips on travel and vacation ideasl, visit: http://www.deskatravel.com and http://www.bahamasbeat.com


Tuesday, 12 October 2010

Canon PowerShot SX120IS 10MP Digital Camera with 10x Optical Images Stabilized Zoom and 3-inch LCD

Canon PowerShot SX120IS 10MP Digital Camera with 10x Optical Images Stabilized Zoom and 3-inch LCD- 10.0 Megapixels- 10x optical zoom with optical image stabilizer-3.0 LCD- DIGIC(R) 4 image processor-Smart auto intelligently selects the proper setting for the camera based on 22 predefined shooting situations-Easy mode takes the guess work out of the equation by determining the right shooting mode for the situation- Requires AA batteries

Click here to find out more from Amazon

Digital Photo Retouching


When digital cameras came on the market, shutterbugs were at first skeptical about the quality of photos that they could expect. As digital photography began to replace traditional film cameras, the quality of the photos proved superior in many ways. No longer did people have to wait for their photos in order to see how they turned out! Bad shots could be deleted immediately, usually in time to replace them with better shots. But some problems still remained and digital photo retouching was sometimes impossible without expensive software.

No camera is perfect and the digital camera is no exception. Although digital cameras now have a plethora of features designed to improve picture quality, they are only as good as the photographer that takes the picture. Lighting conditions are often less than perfect, images can blur because of unexpected movement and your perfect picture can be marred by a bird or other unexpected object entering the frame just as you take the photo. Digital photo retouching can solve those problems and more.

Using professional software, digital photo retouching can make a mediocre photo into a work of art. Lighting conditions can be altered, dispelling shadows or softening glare. Red eye disappears, blurred areas can be sharpened and that errant splotch of ice cream on her lovely white lawn dress is like it never happened at all. The dog that loped into the picture or a bird flying through can be removed without compromising the background.

Digital photo retouching can even whiten your teeth or sculpt a body to appear more muscular or thinner than it actually is. They say the camera adds ten pounds but with digital photo retouching you can look your best in every picture. You can even "age" a photo and convert it to black and white or sepia for an authentic old time appearance.

There is so much you can do with digital photo retouching! However, the software is quite costly and unless you are a professional photographer you probably don't want to make such a big investment. Luckily, digital photo retouching is a skill that professionals have enthusiastically embraced; you can find a professional willing to retouch your photos for reasonable and affordable prices.

Retouching can also be used for enlarging a favorite photograph and sharpen images that would normally appear blurred by the enlarging process. Is your photo perfect except for that stray hair that was blown into a face at the last second? No problem, a professional can fix that! Perhaps your background overwhelms your subject; a digital photo retouching service can crop your photo, retaining the size you want and even adjust the lighting so that it's perfect.


Cameras are only as good as the photographers using them but now, with digital photo retouching, your creativity has no limits except your own imagination.


Monday, 11 October 2010

6 Fantastic Ideas On What to Do with Your Digital Photos


Digital cameras were originally designed to replace film cameras, and since people were used to putting their prints into photo albums, they did the same with digital prints. Well, there's a lot more that you can do with digital photos than print them and put them in a photo album. Here are some ideas.

1) Wallpaper. Set your favorite digital photo to use as wallpaper on your computer's desktop. You will be able to see it every time you use your computer. There are even software programs available that let you choose your favorite photos and rotate using each of them as your desktop wallpaper.

2) Screen Savers. You can program your computer to show a specific photo as your screen saver, or you can set it to rotate through all of the photos in a selected folder in an electronic slide show presentation.

3) Digital Photo Frames. These are a new version of picture frame that can store and display a number of digital photos. These picture frames can be loaded with your favorite photos and set to either display one picture, go through the photos in a set order, or display the photos randomly.

4) Put in On Your Cell Phone. Camera phones are becoming extremely popular. Not only can you take pictures with them, but if you have a picture you really like on your computer you can download it to your phone and use it as your cell phone's wallpaper.

5) Icons. When you use messenger programs, blogs, forums and other communication services, you are often able to set up an icon to represent yourself to other users. You can use your digital photos to create an icon.

6) Blogs and Social Networks. You can post pictures on your blog for everyone to see or upload them to the photo area of your MySpace or other networking page.

These are just a few things that you can do with your digital photos. There are many more possibilities, though. Just use your imagination and have fun!


For more great info on digital cameras visit www.bestdigitalphotoguide.com a website offering tips, advice and resources on topics such as learning how a digital camera works, digital vs classic photography and even using a digital camera buying guide plus so much more.


Sunday, 10 October 2010

Digital Photography Tips - 3 Proven Ways to Improve Your Digital Photos


Want to make your next set of vacation photos really stand out? It's easy if you follow a few simple guidelines to improve the composition of your photos.

Composition is an artistic term for how the various elements visible in your digital photos are arranged. Digital photography gives us all kinds of flexibility and control over the photos we take. Then through the use of digital photo editing software like PhotoShop, we can easily improve how our digital photos look. Still our basic decisions about composition are made when we take a digital photo. Here are some tips to improve your decisions which will then improve your photos.

1. Rule of thirds - This is the most common rule for composing photos, and it can be very effective. Just imagine what you see through the viewfinder of your digital camera as divided by 2 vertical and 2 horizontal stripes into 9 sections or a 3 x 3 grid. You can use the rule of thirds by placing the focal point (most important object) in your photos right on one of those lines, instead of in the center of the photo. For example, if you're taking a photo of a landscape with a building in the scene, place the building in the top 1/3 of the frame, and fill the bottom 2/3's with the foreground. Or if you're taking a photo of a sunset on the ocean, shoot the scene so that the sky fills the top 2/3's of the frame.

2. Don't be afraid of a close-up - Sometimes you can create a very dramatic photo simply by filling the frame with part of an object. For example, if you are attending an antique car show, go ahead and photograph all the cars. But try for some dramatic photos by taking a full-frame shot of just a hood ornament. Or if you're photographing a historic building, try capturing a tight shot of a unique architectural detail.

3. Try different vantage points - Most of our photos show the world from about 5 1/2 to 6 feet off the ground. For a more dramatic effort, try a different angle. Try photographing that antique car from the ground looking up - sort of a dog's eye view. If you can find something to stand on, try shooting down for a bird's eye view.

Changing your shooting angle can make a big difference in how the same scene looks. If you're photographing a sunset over a lake, try taking a shot from almost water level. The waves will stand out clearly against the water.

Digital photo editing software like Photoshop allows you to reframe your photos. You can crop your existing pictures to make their impact stronger by applying the rule of thirds after the fact. You can also select a small detail in your larger photos to crop so that it fills the entire frame. However, digital photo editing software cannot help you much when it comes to camera angle. So when you take your next set of photos, remember the dog and the bird. Let your imagination run free, and you can separate your photos from the ordinary.


Dave Hunt has shot landscape and scenic photos in almost all states of the US and in most countries in Europe. He is the author of numerous articles on photography, travel and recreation. You can find more articles, tips and how-to's, along with and the latest news and information on digital photography at: http://www.digitalphotographygeek.com For tips on travel and vacation ideas, visit: http://www.deskatravel.com and http://www.bahamasbeat.com


Saturday, 9 October 2010

Digital Foci Photo Book 8-Inch Portable Digital Photo Album (PBK-080)

Digital Foci Photo Book 8-Inch Portable Digital Photo Album (PBK-080)Digital Foci Photo Book is a portable digital photo album with an 8-inch 800 x 600 pixel LCD screen supported by LED backlight and 4GB internal flash memory. Featuring a slim design encased in a soft leather-like case for a convenient, elegant photo presentation, Photo Book is a great way to carry collections of digital photos for enjoying and sharing in a variety of settings. Photo Book has a battery life of over 2.5 hours. It’s an ideal family brag book and presentation tool. To use, simply load photos to Photo Book’s internal memory directly from a memory card or USB flash drive. Supported cards include CF, SD, SDHC, MMC, xD, Memory Stick, and MSPRO. You can also transfer photos, videos, and music from the computer via USB connection.Photo Book lets you organize photos into different albums and choose a specific album to view. “Photo Album View” displays each folder as a separate album, showing its folder name and a preview image of the first photo in the album. “Photo Thumbnail View” lets you browse through the thumbnails of the photos in a selected album. In addition to running a full screen photo slideshow with adjustable time intervals, you can also run a slideshow with an elegant page-turning effect, just as if you were flipping through an actual photo album. Music can also be added to play in the background along with your slideshow.Perfect for professional photographers to display photos in an elegant portfolio, Photo Book supports RAW images from a wide selection of DSLRs.Photo Book users can organize photos into different collections, and choose a specific collection to show depending on their audience. Photos are automatically rotated to their correct orientation based on the EXIF data captured by the camera, and can also be zoomed, panned, and rotated. Photo Book comes with soft leather-like case, AC power adapter, Standard USB cable (to computer), USB OTG cable (to USB flash drive), and Quick Start Guide.

Price: $169.00


Click here for more info from Amazon

Learn How To Share Your Photos Easily With Free Digital Photo Albums

Digital photo albums are a great way of sharing your photos with friends and family, whatever country they live in.
What makes digital photo albums so special?
Unlike the old days of film, if you take photos using a digital camera it is now much easier to share these images across the world, using photo albums hosted on a website.
Instead of arranging for extra copies of photos to be made, all you need to do is to open a free account at websites like the Kodak Easyshare Gallery or Photobucket and start uploading your photos. You then decide which style of album you wish to display your photos in and then invite people to view them. You will find that most photo albums sites allow you to comment on your photos. Not only that but you can also allow visitors to add comments too. This takes sharing photos to a new level and of course you can upload from anywhere in the world. You just need access to an internet connection.
So, if you are travelling, your friends and family can see where you are and really get into the experience of your adventures.
What are the benefits of digital photo albums?
The main benefit is the avoidance of hassle when you want to share your photos. Uploading them to a website is a once only operation. You avoid the need for sending large attachments with emails. In my experience you are never sure whether they will reach their destination anyway.
You can request printed photos directly from the photo albums site if you need copies but in particular, friends and family can do this too. A major saving in your time on what is usually a laborious task.
What are the downsides?
You will find that you have to sign up for a free account which grants you access to the main photo albums creation area. However, be aware that you usually have to make a purchase, at least one a year, to keep your account active. This purchase may take the form of a few hard copies of pictures from your digital photo albums or perhaps your images printed on mugs, keyrings or posters etc.
You need to read the terms and conditions carefully as digital photo albums suppliers usually reserve the right to delete your digital photos or videos should you not make the required purchase. But don't worry, some only require the purchase of a few of your digital photos printed and it is not very expensive.


Trevor Sadowski has been taking photos for more than 30 years and loves to help people improve their photos.
For more information and reviews of the main photo albums sites visit Trevor?s website for some solid recommendations.

Epson Perfection V700 Photo Color Scanner

Epson Perfection V700 Photo Color ScannerGet professional quality results from virtually any photographic original with the Epson Perfection V700 photo scanner. With groundbreaking 6400 DPI resolution, the powerful scanner consistantly delivers precision color and detail, whether scanning slides, negatives, or medium-format film. With a 4.0 DMax, it offers exceptional image quality, excellent detail in shadow areas and remarkable tonal range.

Price: $619.00


Click here for more info from Amazon

Friday, 8 October 2010

ViewSonic VFM1530-11 15-Inch 256 MB High Resolution Multimedia Digital Photo Frame (Ebony)

ViewSonic VFM1530-11 15-Inch 256 MB High Resolution Multimedia Digital Photo Frame (Ebony)The 15-Inch ViewSonic VFM1530-11 brings consumers the perfect digital image viewing experience. The ultra fine resolution of 1,024x768 and high quality digital LCD panel deliver the most vivid color and sharp detail performance to display your most precious memories. The 4:3 aspect ratio ensures no image distortion or data loss. The multimedia capabilities support full audio and video functions, which make the VFM1530 a versatile device to showcase your life style in the most fun and creative format. The elegantly designed and detailed finish of the wooden frame compliments any décor at home or in the office. A perfect combination of excellent décor and high-tech gadget, the VFM1530 is the gift for any occasion or to just frame your most favorite memories.

Price: $269.00


Click here for more info from Amazon

Macro Photos of Insects

Below are some great examples of macro photography for taking picture of insects.


Thursday, 7 October 2010

Canon PowerShot SD1200IS 10 MP Digital Camera with 3x Optical Image Stabilized Zoom and 2.5-inch LCD (Dark Gray)

Canon PowerShot SD1200IS 10 MP Digital Camera with 3x Optical Image Stabilized Zoom and 2.5-inch LCD (Dark Gray)Brighter, lighter and more loaded than ever before. Canon's 10.0-megapixel ELPH is the complete package, featuring all the innovative know-how to help you start composing incredibly vibrant and lifelike photos right out of the box. One-year warranty. Model SD1200IS.
Price: $179.00

Click here for more info from Amazon

Wednesday, 6 October 2010

Nikon Coolpix L22 12.0 MP Digital Camera with 3.6x Optical Zoom and 3.0-Inch LCD (Red-primary)

Nikon Coolpix L22 12.0 MP Digital Camera with 3.6x Optical Zoom and 3.0-Inch LCD (Red-primary)
  • 12.0 Megapixels for stunning prints as large as 16 x 20 inches
  • 3.6x Zoom-NIKKOR Glass Lens has a versatile zoom range from 37mm to 134mm telephoto coverage that gets you close to the action while capturing expansive landscapes
  • Big, Bright 3.0-inch LCD makes it easy to compose and share your pictures with a wide-viewing angle and anti-glare coating
  • Easy Auto Mode with Scene Auto Selector simplifies your picture-taking experience by letting the camera automatically select the best setting to get great picture
  • High Quality TV Movies with Sound records 640x480 at 30fps movies for easy in camera playback or on your computer
  • 3-way VR Image Stabilization System
    1. Electronic VR Image Stabilization minimizes the effect of camera shake
    2. Motion Detection automatically detects moving subjects and adjusts shutter speed and ISO setting to compensate for cameras hake and subject movement
    3. Nikon’s original Best Shot Selector (BSS) automatically takes up to 10 shots while the shutter is pressed and saves the sharpest image
  • ISO up to 1600 capability helps give you sharper results when shooting in low light or capturing fast-moving subjects.
  • Smart Portrait System includes:
    1. Smart Portrait Mode makes sure you’ll always catch the decisive moment when your subject smiles.
    2. Blink Warning, when activated alerts you that the subject may have blinked and allows you to retake the photo.
    3. In-Camera Red-Eye Fix™ automatically fixes, while shooting, most instances of red-eye in the camera. You may never see red-eye again
    4. Face-Priority AF Nikon’s face-finding technology that automatically focuses on up to 3 faces
  • AA Batteries for ease of mind with long battery life plus easy, anywhere replacement
  • 16 Scene Modes
  • Macro shooting as close as 2”
  • 5 Color Options for special filter effects. Choose from: standard color, vivid color, black-and-white, sepia and cyanotype
  • EXPEED Image Processing ensures

    Price:


    Click here to buy from Amazon

21 Steps to Perfect Photos

21 Steps to Perfect Photos helps you learn photography in a digital world teaching you how to take great photos using any camera. This book focuses on teaching through practical assignments resulting in immediate photography success.


Check it out!

Get Paid For Your Photos

Your just a few clicks away from your photos paying you! For non photographer and pro alike. Top Dollar For Your Pics.


Check it out!

Tuesday, 5 October 2010

Photo Techniques Program

Take Better Photos following an easy photography course that will improve your photos in no time.


Check it out!

Monday, 4 October 2010

Digital Photography Secrets

Tricks and Techniques for Better Images With Your Digital Camera. Everything the professionals know, but dont want You to know about using your digital camera to take stunning photos!


Check it out!

Printing digital photos and DPI, JPEG and KB

Print digital photography has opened a whole new world for amateur and professional photographers alike.
For most photographers, back up the print digital photography offers unprecedented freedom to get the best digital shots. no more worrying about this valuable piece of film running out too soon-all without you know for sure that nothing worth is on it!

However, when it comes to getting real printing digital photography made, there are some things to keep in mind to avoid unnecessary too photo-quality paper-not to mention your expensive printer ink.
With the press of digital photographs in mind, the first thing to watch is to ensure that you download images in their full resolution. If you end up with images 72 dpi (dots per inch), the print quality will be useless. A resolution of 72 dpi is only good for viewing your computer screen, but 200-300 dpi will make a good print quality 8 x 10.

Large prints are usually viewed from a greater distance, therefore for a 13 x 19-inch print 200 pixels per inch is probably pretty, whereas you might need for a printing of 5 x 7 inches around 300 pixels per inch.
Looking at the file size you learn quickly to be an expert judge quality. an image of 100 kb (kilobytes) or less, it's probably too low resolution for printing digital photography of good quality.Once you get to a minimum of 400 kb, you work with a resolution more useful for an 8 x 10 print.
When printing of digital photography, you will primarily work with the JPEG file format.Keep in mind that whenever you open and save a JPEG file, you lose some information you will therefore image. want to do all changes in one sitting and then save them at once.

If you're quite proud of your photo-effort or if you want these shots family to be available for the next generation-want to make prints on paper decent, just like you are used to in ' old days ' of photo paper!In the end, print digital photography will be only as good as with the paper you are using.
Contains many new coated papers specifically for this purpose, and you should look at what is recommended for your printer.

These printing papers digital photography doesn't come cheap, then carefully plan.Print only final after cropping, or completion of other changes, such as adding a border with the imaging software.
The card more long lasting acid free, usually called archival paper in the world of inkjet printing.
Color inkjet and laser printers are good for regular graphical and text, but not always great for printing digital photographs. PictBridge Printers that are enabled, allow digital photography print directly from your camera. portable printers, such as the series HP Photosmart 320, allow you to take a moment and print images of digital photography 4 x 6 at any point in motion.

Incidentally, for prints 4 x 6 inches smaller, sublimation printers give excellent quality prints, and are usually waterproof-as were used for the prints! However, materials for printing this digital photography doesn't come cheap!

If you can't get good enough results with printing your digital photography, especially if you're printing larger than 8 x 10, you can try one of the brick and mortar, or even online photo labs who make use of dedicated photo printers with excellent results.

Photo Labs can handle digital files directly from your memory card. take your homemade CDS, digital camera or memory card for printing long digital photography professional quality.
For more information visit Best-Digital-photography.com

Sunday, 3 October 2010

How to take perfect pictures of people "in digital photography


One of the things that people ask me more about digital photography is like picking the perfect "people pictures." Digital photography is great for people, because you can simply delete the ones you don't like and show them on the spot that looks like the digital photo.
In each session of digital photography, whether it be photographic portrait or photography to a birthday party you take prior knowledge to get the "perfect" digital photos people.
So here are the secrets of digital photography for this type of photography.
People photography secret number 1:

Horizontal and vertical

Most people who make digital photography people keep the camera digital horizontal. not sure why this is; very possibly because the digital camera is built in this way, but you really can do well with holding the camera vertically as well. horizontal digital photos of people is ok, but work best when you take a group photo rather than a single picture of someone. A vertical angle for your digital photo people can give you a great composition to close up and tells you a lot more about that person that it will be a horizontal. Horizontal angles in digital photography of individuals tends to increase the amount of potential mess and irrelevant objects in the frame.

People secret No. 2 photography

Where to put your people in the frame

In digital photography, pictures of people work better by creating some interesting composition.Avoid placing the individual at the heart of the frame, just because everyone else does their digital photography that way; be unique and creative and you'll get a very be result.And good digital photography is all about capturing that special moment of someone for last and reflect something positive about that person, right?

People photography secret number 3

Go Candid. Personally, in my experience as somebody who does the digital photography for a living, I can tell you that candida digital photographs work so much better then staid photo. is all the better capture someone as they laugh a funny joke, or see their friend for the first time in a while, or even talk quietly with others, is much more interesting and creates a positive picture of someone of a shot of them by looking at the camera with a posed shot; Hey anyone can do it but take that digital photos with their laughing and not knowing that you're being photographed acquires a side to them that not everyone sees Will show them. of good mood and create a positive image for all those who see that digital photos from now on. get creative with photography; try black-and-white and sepia. And also try to take the digital photos of them doing something you love, like playing an instrument for example.

Good luck!


Here are 10 techniques in digital photography

Digital photography revolutionized the picture taking, more movies of old school and guide to the drug store and waiting for film developing. Digital cameras allow the photographer to concentrate on taking pictures and via simply remove those that are not up to standards.


Before watching effective techniques, digital photography, it is important to understand the difference between the old school cameras and new digital technology. Same as the old school SLR (single lens reflex) cameras, digital SLR or DSLR camera (digital single lens reflex) use lens and mirror.But instead of a film that records the image, a DSLR camera uses light sensor chips and digital memory. in other words, a DSLR camera is the computerized version of the traditional SLR camera.


Using these simple and effective techniques digital photography can help those taking photographs with a DSLR cameras capturing the best images using the new art of digital photography.


10 techniques digital photography


1. Probably the biggest feature of digital cameras is fabulous LCD that allows real-time preview of pictures as you take them.One of the safest and most practical of digital photography is to make sure you use the LCD to its full potential to preview each and making sure that every image is perfect, if it is not enough click delete it and re shoot.


2. Ty to get a digital camera with image stabilization.If you don't know this feature then here is a technique of digital photography to get clearer images without blur. Hold the hand when taking pictures, to prevent their agitation and navigation. Moreover, it is better to watch up to optical viewfinder when taking pictures, rather than the electronic viewfinder. This helps you see exactly what the acquisition and also helps to keep your camera steady when taking pictures.


3. Flash seems to be a challenge for most photographers most beginners. Flash technology only Kindle a high an object within an average of 10-15 meters.Ensure that you move in closer, or add more light to the subject area.


4. why digital cameras can take some time for focusing of cameras, a bit of good digital photography to avoid blurry and shots wide focus is half-press the shutter button until the camera took the time to lock the focus, then press the button to take the shot.


5. the right lens remains the same, whether using the new technology of digital photography or an old camera. For example, if the Sun is behind an image, the image will be silhouette.If the light is in front of the image, the image will appear strabismus.


6. Another technique of digital photography is when you use a polarizer, be sure that the light source is perpendicular to the object. If you haven't then a polarising filter functionality good digital photography technique is to use a quality pair of sunglasses.Place your sunglasses closest to the camera lens as possible, then check their position in the LCD viewfinder to make sure you don't have the rims sunglasses in the image.


7. instead of film, digital photography uses memory cards to save shots. A good technique digital photography that can prevent a lot of regret is that you always back up your memory with you.There's nothing worse than missing the big shot, because there is no more storage space in the camera.


8. A good technique digital photography for shooting bright outdoor landscapes and portraits is to change the setting from automatic to cloudy white balance, this will yield hits brighter and clearer. This will give a warming filter on the camera and increases the red and yellow resulting in richer and brighter images.


9. zoom in to emphasize a particular good or characteristic of the subject caught. Avoid becoming too big of a coup active, consider what you want to capture and to focus on this image, avoiding background s as buildings and landscape, it will give clearer and better photo of the desired object.


10. the practice is probably the best tip. the best technique of digital photography you practice using your camera. know and all controls and what they do. Take lots of pictures and analyze what works best with the camera and will soon be an expert with its list of techniques digital photography.


Digital cameras have really simplified photography and done so much more mobile and convenient click. And that some of these techniques digital photography employ will deliver the finest images of life's memories.

Saturday, 2 October 2010

Black and white Digital Photos

There will always be room for the particular quality and elegance of black-and-white pictures even in digital photography, especially when combined with the many benefits offered by digital photography.


In digital photography imaging and there are many features and techniques available for managing and controlling image. whereas these aim primarily to aspects of color, many of the techniques can be applied to black and white of digital photography.


Most effects you can create in traditional darkroom can be imitated with imaging software such as Adobe Photoshop. If photography black and white is your area of expertise, you need to discover the wonderful world of black and white of digital photography.


As digital cameras typically only take pictures in color, the most basic element of the digital darkroom, you need to master is how and when to turn your digital pictures to colour in exactly the graphic black and white digital photography you want.


In Adobe Photoshop you can follow three paths according to this conversion.


Black and white for digital photography, the first and simplest way is to make a simple grayscale conversion, machine for the black and white. This says the software to throw away all color information, leaving only the image using shades of gray.


The snag is that in this method can leave the image looking relatively flat, depending on the original colors contrast Adjustment thereafter. can cause loss of a little detail.


Another way to get that color out of the image, is to separate the colors of the original in that way that you end up with a lightness brightness separately or channel, which can be used as a grayscale image.This method of implementation and white digital photography should give better results than a conversion to grayscale simple.


A better way from both previous techniques black-and-white digital photography for getting that grayscale image, you can use the mixer channels Will retain Photoshop. an RGB image (color) but convert all channels in black and white and then adjust them separately and in combination.


This is just a few of the many techniques and procedures that can explore the world of black and white digital photography ...


If you are just starting out, some useful tips to keep in mind when reading comfortable with black and white of digital photography are:


The Canon 20 d displays the color black and white for the raw mode, giving a good idea of what will be similar to images.


Black-and-white digital photography you must be careful not to overexpose highlights. you want to capture all the data is possible without the highlights of fall on both sides of the histogram.


Do not convert to grayscale too soon. blend layer Masking, etc is easier with a color file compared with a monochromatic file.


Photoshop's channel Mixer offers the most control over the tones of your image.


To get more tonal richness of the printed image, print the image in black and white digital photography in RGB format, otherwise it is involved only the black ink.


After all is said and done, it will be good to keep in mind that there are more similarities than differences between the basic elements of black and white, digital photography and cinematic ones.


As a photographer in black and white, you still have to figure out how to read the qualities of light and color in the scene in front of you, to be able to predict how they will translate into the image in black and white final digital photography!


For more information visit Best-Digital-photography.com