Get My Tips On Digital Photography
Name:
Email:

I respect your email privacy and you can unsubscribe at and time.

Wednesday, 27 October 2010

Canon Powershot S95 Review


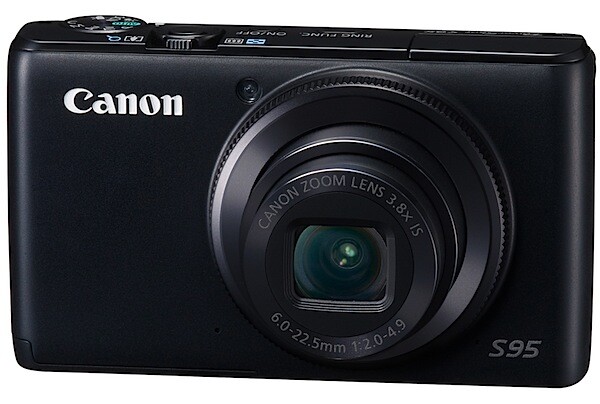
At first the Canon PowerShot S95 seems to be just another point-and-shooter: compact, all black and stylish. Then a quick glance over the specs and external controls leads you to think otherwise.

PowerShot S95_01.jpg
PowerShot S95_04.jpg

Canon Powershot S95 Features

The CCD has 10.0 megapixels; the lens is a fast f2 zoom that has a range from 28-105mm as a 35 SLR equivalent.

In exposure, it has access to Program AE as well as shutter and aperture priority plus manual.
Using a hybrid IS system the camera offers a more advanced image stabilisation, reducing camera shake by the equivalent of four f stops. 

Fruit and veg section 2.jpg
The camera has a High Dynamic Range mode accomplished by simultaneously capturing three images with different exposures, then combining them into a single image using in-camera software. 

Wig dummies 3.jpg

Maximum image size is 3648×2736 pixels, enabling a 31×23 cm print to be made at 300 dpi. Movies: 1280×720 pixels at 30 fps.

And the good news keeps coming: you can shoot pictures in RAW and JEPG as well as simultaneous RAW+JPEG files saved to the card.

The less than good news is the maximum continuous speed is only 1.9 images/second with focus and exposure set before shooting; if you want continuous focus, the capture rate is only seven frames in 10 seconds. The camera will continue shooting as long as you hold down the shutter button.

Canon Powershot S95 ISO Tests

Canon PowerShot S95 ISO 80 f4 1:20 sec.jpg
At ISO 80, superb of course.
Canon PowerShot S95 ISO 400 f4 1:100 sec.jpg
At ISO 400, nearly as good but with a very slight rise in noise.
Canon PowerShot S95 ISO 800 f4 1:200.jpg
At ISO 800, nearly the same as ISO 400.
Canon PowerShot S95 ISO 1600 f4 1:400 sec.jpg
At ISO 1600, not much noisier than ISO 800. Still useable.
Canon PowerShot S95 ISO 3200 f4 1:800 sec.jpg

At ISO 3200, noise is noticeable and definition lower. Useable at a pinch.

Startup Time

It took less than two seconds from power on to first shot. Follow-ons about a second apart.

Distortion

There was no sign of any distortion with the zoom lens set at wide and tele. A good performance.

Poster 2.jpg

Comment

There’s not much to whinge about… except the all black finish naturally leads to the top controls — power and shutter are in black —being hard to see. Maybe it’s me.

I found the S95 a delight to use, very pro and quick. Quality: pin sharp pics, excellent tonal range.
Why you would buy the S95: you would prefer a vari-angle LCD screen; you need RAW capture.
Why you wouldn’t: the camera does not shoot Full HD 1920×1080 pixels; it does not offer Adobe RGB colour space.

However, this is a very special camera.

Canon Powershot S95 Specifications

Image Sensor: 10.0 million effective pixels.
Metering: Evaluative, centre-weighted average, spot.
Sensor Size: 14.9mm CCD.
Lens: Canon f2.0-4.9/6.0-22.5mm (28-105mm as 35 SLR equivalent).
Shutter Speed: 15 to 1/1600 second.
Continuous Shooting: 0.8 to 1.9 images/second.
Memory: SD, SDHC, SDXC, MMC, MMCplus, HC MMC plus cards.
Image Sizes (pixels): 3648×2736 to 640×360. Movies: 1280×720, 640×480, 320×240 at 30 fps.
LCD Screen: 7.6cm LCD (461,000 pixels).
File Formats: RAW, JPEG, RAW+JPEG, Motion JPEG.
ISO Sensitivity: Auto, 80 to 3200.
Interface: USB 2.0, HDMI mini, AV.
Power: Rechargeable lithium ion battery, DC input.
Dimensions: 99.8×58.4×29.5 WHDmm.
Weight: Approx. 193 g (inc battery and card).
Price: Get a price on the Canon PowerShot S95 at Amazon.


Click here for more info on the Canon PowerShot S95

Tuesday, 26 October 2010

5 Essential Digital Photography Accessories You Can Make Yourself


digital photography accessoriesPhotography certainly isn’t the cheapest of hobbies to take up. If you’re serious about it then you’re going to need a good digital SLR, a selection of lenses and a decent set of extras to keep you snap-happy.

There’s a startling array of accessories out there for the amateur enthusiast, and though many are cheap there’s plenty that aren’t. Luckily, you’ll be pleased to hear that many of those costly bits of plastic and card are simply that – plastic and card, which can be built for a fraction of the cost.

Those of you who don’t have the cash to flash and enjoy a little challenge will find some of the do-it-yourself projects in this list satisfying, especially when you’re saving money (probably to buy more lenses, if you’re anything like me).

The DIY Softbox

If you’ve ever taken an interest in macro photography then pay attention. A softbox is essentially a light tent, designed to soften harsh light and shadows to provide a nice even exposure and near-perfect lighting.

digital photography accessories

Pretty much every “product shot” of any gadget you own will have been shot in one of these, and you can quite easily customise it to suit your own demands. A nice shiny floor tile from your local DIY store is all it takes to sex one these up!

To make one you’re going to need an old cardboard box, some black and white card and a source of light. If you don’t have a flash unit, you can fire remotely (either wirelessly or with a hot-shoe cord) then you could use a desk lamp or even bright torch, just remember your white balance.

Sunday, 24 October 2010

Shooting Landscapes with Longer Focal Lengths


One of the simpler tips that I would suggest for those wanting to add a little variety to their landscape photography is to shoot with longer focal lengths. 


400mm - Image by Tambako the Jagua


While the majority of landscape photography is done with wide angle lenses (and rightly so – it’s a great way to capture to dramatic wide vistas) it can be very effective to take a lens with a longer focal length with you next time you set out to capture a scene. 

Friday, 22 October 2010

Setting Up Your Digital Camera For HDR Shooting

Today we begin a 3 part series – a Beginners Guide to HDR Photography by looking at how to set your digital camera up for shooting HDR images. This series is written by James Brandon.

Introduction

HDRsample.jpg

You’ve probably heard of High Dynamic Range (HDR) Photography, it’s made quite an entrance into the world of digital photography.
If you haven’t, the HDR process is accomplished by taking multiple exposures of a high contrast scene (usually a landscape or cityscape), at different levels of brightness, and then combining the best light from each exposure into one image.

The end result is a stunning image that very closely resembles how the human eye views a scene. This process of digital manipulation has caused a bit of controversy and debate in the world of photography, especially with images that are “over-cooked.” One thing is for sure though, HDR is here to stay. When done right, this unique and in depth processing technique can produce beautiful works of art that mimic the way we view and remember a landscape or scene.

The above image is an example of what HDR processing can produce. This image, taken from the Big Island of Hawaii, would not be possible without HDR processing. It was taken around noon, the harshest light of the day. The first image is the best image my camera could produce given the situation. While still beautiful, there are obvious problems. Get ready, this article is going to show you how to take your digital camera and turn it into an HDR shooting machine!

Step 1: Locate Your Camera Manual

I know, we all hate manuals. But if you want to become the best photographer you can be, you need to become best friends with your cameras manual. Spend time with it, take it with you on trips, read it in the airplane, memorize every setting on your camera so you know it inside and out, make your significant other jealous of it. And for this lesson, have it handy as a decoder in case you have a different camera model. If you don’t have your manual, simply do a Google search for: (your camera model) manual. You should be able to easily find a pdf version to download.

Wednesday, 20 October 2010

Methods to Make Your Photos Exceptional With Simple Photo Editing Techniques

An image can capture that special moment of yours which you will always cherish. How well it had been captured and edited will sweeten your memory all the more. But if the image wasn't captured well maybe edited later. Here comes the essential role of photo editing. These days photo editing is an essential part of photography itself. A lot of emphasis is put on it.

The way in which a photograph is edited can make a lot of difference. If some simple editing methods are kept in mind and followed they will result in getting exceptional photos. These techniques might look simple and easy but they do make a huge difference to the overall result. For this reason, we will be discussing some very simple and basic editing techniques which would be beneficial for you.

The first and foremost tip you need to remember before starting the editing is that, to get superior and great photos you will need to try to make use of the techniques mentioned below

1. Brightness/Contrast: this is the most simple and most widely used technique. This is to be used if the image was too dark or was clicked in a too bright environment.

2. Hue and saturation: these are used basically to control the color content of a photograph.
Hue balances the color while Saturation alters the strength of the color.

3. Removing red eye: most of the imagee editing software programs have red eye removal facility. Just select the red eye removal icon and choose the area around the eyes. The red eye will be removed.

4. Sharpen the image: by sharpening a picture the photo will give a much better look and would be less grainy. It will give a crisp image.

5. Sizing: the size of a photo also determines the quality you are getting.

6. Noise: this is used to add a film of grain over the photo. It will give you a classic look.

7. Adjusting color levels : the color levels may be adjusted in order to give a more balanced use of all colors as well as remove different color imbalances.

These are a few of the very basic editing techniques that have been discussed. These might seem to you quite simple or few in number but they will certainly help you to achieve outstanding photos.


Photo Editor X Photo Editing Software Banner

12 Ways To Never Miss A Photo Opportunity

from Digital Photography School by Jim Goldstein

The following post on 12 Ways To Never Miss A Photo Opportunity is by San Francisco based photographer Jim M. Goldstein. Learn more about him at the end of this post.

Nothing is more frustrating than seeing a great moment to photograph, but missing the opportunity to do so. I’ve missed my fair share of great moments either due to timing or worse lack of preparedness. Either way it’s no fun to miss a photo whatever the circumstances. The Art Of Being Prepared is just that, an art. So what can you do to minimize the chance you’ll miss that next great photo? Here are 12 ways to never miss a photo…

1. Have a camera bag that enables you to easily and quickly access your camera

lowepro-slingshot-100If you’re stuck with an overly complicated bag that takes too long to open or is organized in such a way that other gear is in the way of you getting to your camera quickly you’re guaranteed to miss that next great spontaneous photo. Look for bags that have quick access flaps and aren’t cumbersome to secure.
note from the editor: lately we’ve been using a Lowepro SlingShot 100 (pictured left) which enables you to quickly get your DSLR off your back by flipping it around.


2. Be sure to have not just (1) one fully charged battery but (2) two

It’s easy to loose track of how long you’ve been using one battery and if your battery status is 1/4 full what does that really mean? Is a 1/4 battery going to last 30 minutes or 20 photos? It’s tough to tell and you might not know it, but battery life is dependent on how cold it is. Yup that’s right cold batteries don’t last as long, but there is a way around that as I discuss in a recent photo outing “Los Angeles City Lights & Maximizing Your Battery Life“. The trick… warm up your battery to squeeze out a few extra photos. Certainly a good tip to know if you’re in a squeeze, but why play with fire when you can just plan ahead. Carry that second battery with you and never make an excuse to leave it behind. You won’t regret it.


Sea Nettle Jellyfish at the Monterey Bay Aquarium photo by Jim M. Goldstein


3. Be sure to clean the front and rear elements of your lens to minimize spots (optionally cleaning your camera sensor)

Spots in your photos are first and foremost lost data. Data you can fill with a cloning or healing brush, but lost data none the less. Why miss out on the original when you can get it right the first time with a little forethought. Properly preparing your lenses and camera will enable you to get the photo right the first time reduce the time you spend post-processing and dealing with spotting your images.

Sunday, 17 October 2010

Books Scott Kelby's Digital Photography Boxed Set


The Digital Photography Boxed Set by Scott Kelby contains the following books:
The Digital Photography Book
The Digital Photography Book, Volume 2
The Digital Photography Book, Volume 3

Scott Kelby, the man who changed the "digital darkroom" forever with his groundbreaking, #1 bestselling, award-winning book The Photoshop Book for Digital Photographers, shows which button to push, which setting to use, when to use them, and hundreds of the most closely guarded photographic "tricks of the trade" to get budding photographers shooting dramatically better-looking, sharper, more colorful, more professional-looking photos with their digital camera every time they press the shutter button.

Scott tackles the most important side of digital photography--how to take pro-quality shots using the same tricks today's top digital pros use (and it's easier than you'd think). Each chapter is packed with plain English tips on using flash, shooting close up photography, travel photography, shooting people, and even how to build a studio from scratch, where he demystifies the process so anyone can start taking pro-quality portraits today! Plus, he's got full chapters on his most requested topics, including loads of tips for landscape photographers, wedding photographers, and there's an entire chapter devoted to sharing some of the pro's secrets for making your photos look more professional, no matter what you're shooting.